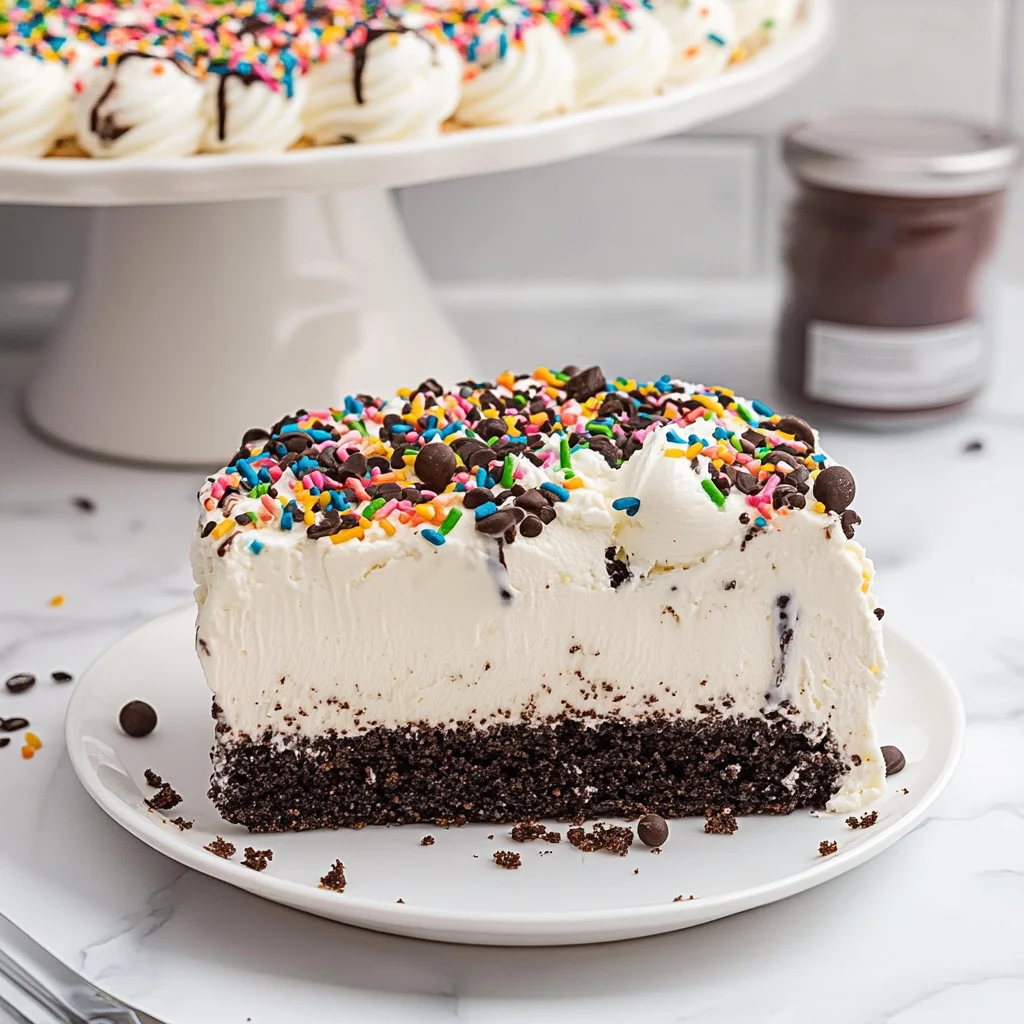
Imagine slicing into a beautifully layered dairy queen ice cream cake, where rich chocolate cake meets creamy vanilla ice cream, all enveloped in a luscious fudge filling. The moment you cut through this decadent treat, the inviting aroma of baked cocoa wafts through the air, teasing your taste buds with promises of sweetness and indulgence. Each bite offers a delightful contrast between the soft, moist cake and the cool, velvety ice cream, creating a harmonious blend that’s perfect for any celebration.
Remember those special occasions when cake was more than just dessert; it was a centerpiece of joy and laughter? This recipe not only captures that nostalgia but also makes it easy to recreate at home. With straightforward steps and simple ingredients, you’ll find that making your own dairy queen ice cream cake is both rewarding and fun—perfect for impressing friends or brightening up a family gathering. Let’s dive into the details of how to bring this delightful dessert to life!
Why You'll Love This Recipe
- This Dairy Queen ice cream cake recipe is a delightful combination of rich chocolate cake and creamy vanilla ice cream that everyone will adore.
- The ease of preparation makes it perfect for both novice bakers and seasoned pros alike, allowing you to create a stunning dessert with minimal effort.
- Its beautiful layers not only please the eye but also provide a satisfying mix of textures and flavors that will impress your guests.
- Plus, you can customize it with your favorite toppings to make it uniquely yours!
Now that you’ve got the motivation to bake, let’s dive into the detailed step-by-step instructions for crafting this delectable dessert.
The first time I served this Dairy Queen ice cream cake to my family, their delighted smiles and excited cheers filled the room, making all the effort worthwhile. It felt like a sweet celebration of togetherness and joy. Now, let’s dive into the recipe details!
Essential Ingredients
To create a delightful Dairy Queen ice cream cake, you will need the following ingredients.
All-purpose flour: Use 1 cup of sifted all-purpose flour for the chocolate cake base; sifting helps to aerate the flour and remove lumps.
Granulated sugar: This recipe calls for 1 cup of granulated sugar, which adds sweetness and moisture to the cake.
Unsweetened cocoa powder: Incorporate 1/2 cup of sifted unsweetened cocoa powder for that rich chocolate flavor; sifting ensures a smooth batter.
Baking powder: Add 1 teaspoon of baking powder to help the cake rise properly and achieve a light texture.
Baking soda: Use 1 teaspoon of baking soda, which reacts with the acidic components in the batter to provide lift.
Salt: A pinch of salt (1/2 teaspoon) enhances the sweetness and balances flavors in your chocolate cake.
Large egg: One large egg at room temperature binds the ingredients together and adds moisture to your cake.
Vegetable oil: Use 1/2 cup of vegetable oil for a moist texture; it prevents the cake from becoming dry during baking.
Vanilla extract: A teaspoon of vanilla extract enriches the overall flavor profile, making your cake taste exceptional.
Boiling water: Carefully stir in 1/2 cup of boiling water into your batter; this step helps to dissolve the cocoa and create a fudgy consistency.
Vanilla ice cream: You’ll need 1 quart of slightly softened vanilla ice cream for an easy spreading layer; let it sit at room temperature for about 10 minutes before using.
Chocolate fudge sauce: Half a cup of chocolate fudge sauce adds decadence between layers; you can use store-bought or homemade for convenience.
Heavy whipping cream: For your whipped topping, use 1 cup of chilled heavy whipping cream; this will ensure stiff peaks when whipped properly.
Powdered sugar: Add 1/4 cup of powdered sugar to sweeten your whipped cream topping without grittiness, allowing for a smooth texture.
Chocolate shavings: Optionally, use 1/4 cup of chocolate shavings as a garnish; they add an elegant finish and enhance presentation.
The full ingredients list, including measurements, is provided in the recipe card directly below.
Let’s Make It Together
Step 1: Prepare the Chocolate Cake:Preheat your oven to 350°F (175°C) and take a moment to savor the rich chocolate aroma that will soon fill your kitchen. Grease and line two 9-inch round cake pans with parchment paper to ensure easy release. In a large mixing bowl, combine 1 cup of sifted all-purpose flour, 1 cup of granulated sugar, 1/2 cup of sifted unsweetened cocoa powder, 1 tsp baking powder, 1 tsp baking soda, and 1/2 tsp salt. Whisk these dry ingredients together until they’re well blended. Next, add in one room temperature egg, 1/2 cup vegetable oil, and 1 tsp vanilla extract. Mix on medium speed for about 2 minutes until you achieve a smooth batter. Don’t forget to carefully stir in the boiling water — it will make the batter thin but trust me, this is key for that moist texture! Pour the batter evenly into your prepared pans and bake for about 30 minutes or until a toothpick inserted in the center comes out clean.
Step 2: Cool the Cakes:Once your cakes are baked to perfection, remove them from the oven and let them cool in the pans for about 10 minutes. The smell of chocolate will have you excited! Then, gently transfer them to a wire rack to cool completely. This step is essential because if you assemble too soon, the ice cream will melt into a gooey mess instead of creating that delightful layered effect we’re going for.
Step 3: Assemble the Ice Cream Cake:With both cake layers fully cooled, place one layer on a serving plate. Spread a generous layer of fudge sauce (about 1/2 cup) over the top of the cake — watch how it glistens as you spread it evenly! Now comes the fun part: scoop your softened quart of vanilla ice cream onto that fudge layer and spread it with an offset spatula for a smooth finish. The contrast between the rich chocolate cake and creamy ice cream is simply irresistible! Gently place the second layer on top of the ice cream and press down lightly to ensure everything adheres nicely. Cover with plastic wrap and pop it into the freezer for at least 2 hours until your ice cream is firm.
Step 4: Prepare the Whipped Topping:While waiting for your cake to freeze, let’s whip up some topping! In a chilled mixing bowl (this helps achieve those perfect peaks), combine 1 cup of chilled heavy whipping cream, 1/4 cup powdered sugar, and another teaspoon of vanilla extract. Use an electric mixer on medium-high speed until stiff peaks form; you’ll know it’s ready when you lift the beaters and see that beautiful shape hold its form!
Step 5: Decorate Your Cake:After those two hours have passed and your cake is perfectly set, remove it from the freezer. Now spread that luscious whipped topping generously over both the top and sides using your trusty offset spatula. For an extra touch of decadence, sprinkle some chocolate shavings on top if desired — they add both texture and visual appeal! Finally, return your masterpiece to the freezer for another quick chill (about 30 minutes) before slicing into it.
The anticipation builds as we prepare to serve this delightful treat at our next gathering!
Add Your Touch
Get creative with your Dairy Queen ice cream cake by swapping the vanilla ice cream for flavors like chocolate or mint to elevate the taste. Consider incorporating crushed Oreos or sprinkles between layers for added texture and fun. If you’re a fan of fruit, layering in fresh strawberries or raspberries can introduce a refreshing twist. Don’t hesitate to experiment with different fudge sauces, such as caramel or peanut butter, to personalize your cake further. Remember, this recipe is yours to customize—trust your instincts and enjoy the process! Now that you’ve got the basics down, let’s explore some fun serving ideas.
Storing & Serving
To keep your Dairy Queen ice cream cake fresh, store it in the freezer, tightly wrapped in plastic wrap or in an airtight container. It will maintain its best flavor and texture for up to one week. When serving, let the cake sit at room temperature for about 10 minutes to soften slightly for easier slicing. Enjoy this delightful treat with friends and family! Now, let’s explore some delicious flavor variations to elevate your ice cream cake experience.
Chef's Helpful Tips
- 1. Ensure Ingredients Are Room Temperature: For the best texture in your dairy queen ice cream cake, make sure your egg and vanilla ice cream are at room temperature before mixing. This helps create a smoother batter and easier spreading of the ice cream layer.
- Cool Cakes Completely: After baking, let your chocolate cakes cool completely on a wire rack before assembling. This prevents the ice cream from melting prematurely and ensures a clean, layered look when you cut into the cake.
- Use an Offset Spatula for Spreading: When spreading the fudge sauce and ice cream layers, an offset spatula provides better control and a smoother finish. It’s especially helpful for getting an even layer without disturbing the cake beneath.
With these tips in mind, let’s delve into some creative variations to make your dairy queen ice cream cake even more special!
As I served the first slice of this homemade Dairy Queen ice cream cake, the delighted smiles of my family reminded me that food truly brings us together in the sweetest ways.
How to Know It’s Done Perfectly
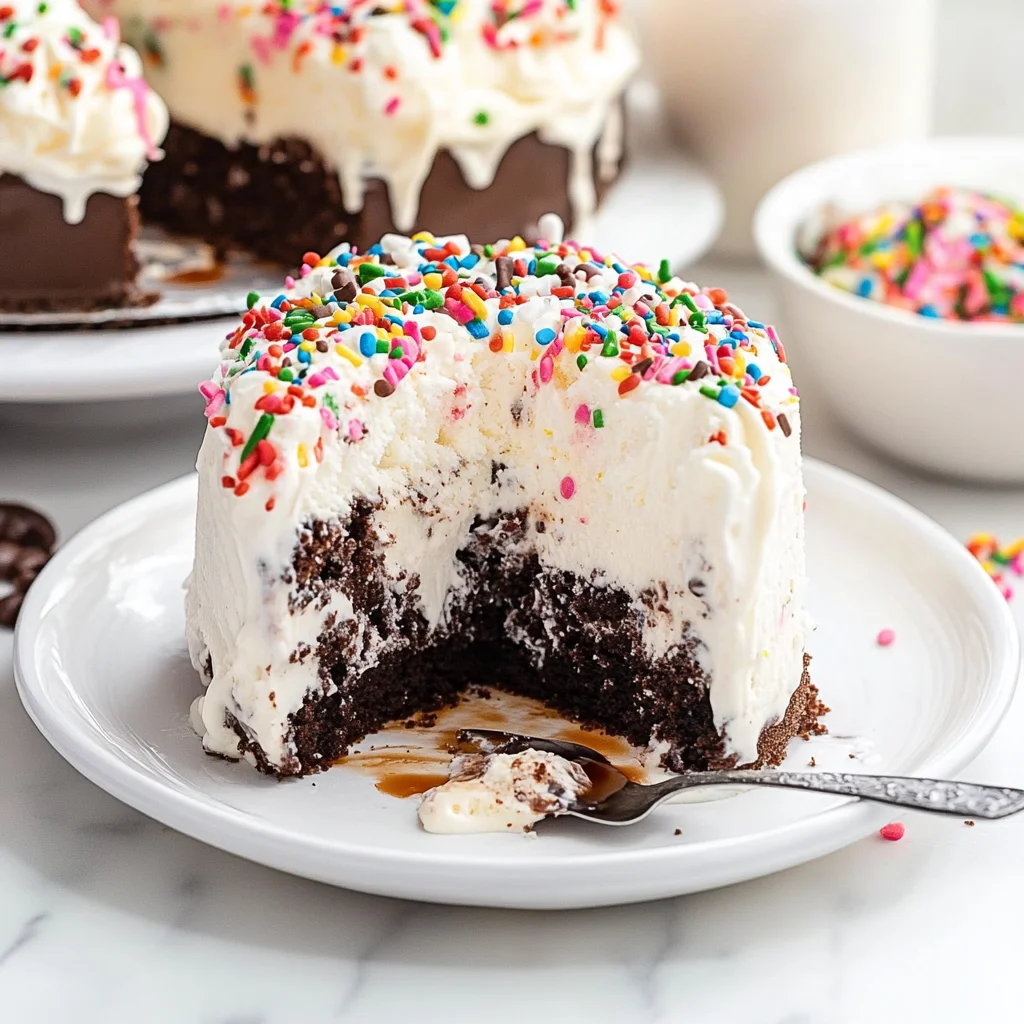
The Dairy Queen ice cream cake should have a moist, tender chocolate cake that springs back when lightly pressed. The ice cream layer should be firm yet creamy, and the whipped topping should hold its shape with a smooth finish. A delightful aroma of chocolate and vanilla signifies success; slight variations in texture are perfectly normal!
With your cake ready, let’s dive into some creative decoration ideas to elevate your dessert.
FAQ
What makes the Dairy Queen ice cream cake unique compared to other ice cream cakes?
The Dairy Queen ice cream cake is distinctive due to its combination of moist chocolate cake layers, creamy vanilla ice cream, and a rich fudge filling, all topped with light whipped topping. This layering creates a delightful contrast in texture and flavor that sets it apart from standard ice cream cakes.
Can I customize the flavors in my Dairy Queen ice cream cake recipe?
Absolutely! While this recipe features vanilla ice cream and chocolate cake, feel free to experiment with different flavors. You can substitute chocolate cake with vanilla or red velvet, and swap out vanilla ice cream for chocolate or any other favorite flavor to create your own personalized version.
How long can the Dairy Queen ice cream cake be stored in the freezer?
The Dairy Queen ice cream cake can typically be stored in the freezer for up to one month. Just ensure it’s tightly wrapped with plastic wrap or aluminum foil to prevent freezer burn and maintain its delicious taste.
Is the whipped topping necessary for the Dairy Queen ice cream cake?
While the whipped topping adds a delightful finishing touch and visual appeal, you can omit it if you prefer a lighter dessert. However, using whipped topping enhances both texture and presentation, making it more reminiscent of a classic Dairy Queen cake.
Can I make the Dairy Queen ice cream cake ahead of time?
Yes, you can prepare the Dairy Queen ice cream cake ahead of time! Assemble it completely and freeze it for at least two hours before serving. You can also keep it in the freezer for several days before your event, ensuring it’s ready when you are.
This FAQ section should help address common inquiries as you prepare your delicious treat; now let’s dive into some tips for perfecting your baking skills!