
Imagine biting into a classic tuna sandwich, where the creamy filling mingles with the crunch of fresh celery and the slight bite of red onion. The aroma of freshly made bread wafts through the air as you prepare each layer, from the crisp romaine lettuce to the juicy slice of tomato that adds a burst of color and flavor. It’s not just a meal; it’s pure comfort wrapped in two slices of wholesome goodness.
As you gather the simple ingredients, you’ll find that this tuna sandwich is not only quick to whip up but also brings back memories of family gatherings and sunny picnics. The ease of preparation makes it perfect for a busy day, yet each bite feels like a small celebration. Let’s dive into this delightful recipe that promises satisfaction and nostalgia in every mouthful.
Why You'll Love This Recipe
- This classic tuna sandwich is a quick and easy meal that delivers on flavor and satisfaction.
- With its creamy tuna filling and fresh ingredients, it’s visually appealing and perfect for lunch or a light dinner.
- The versatility of this recipe allows you to customize it with your favorite bread or toppings, making each sandwich unique.
- Enjoy a delightful blend of textures and tastes that will leave you wanting more!
As I plated the tuna sandwich, my daughter took a bite and her eyes lit up with delight. “This is the best!” she exclaimed, reminding me how simple ingredients can create such joyful moments at the table. Now, let’s dive into the recipe details.
Essential Ingredients
To create a delicious classic tuna sandwich, gather the following ingredients.
2 cans tuna in water: Ensure the tuna is well-drained for the best texture and flavor in your filling.
1/4 cup mayonnaise: Adjust this amount to suit your taste; you can use a lighter version if preferred.
1 tablespoon Dijon mustard: This ingredient is optional but adds a delightful tang to enhance the flavor profile of the tuna.
1 stalk celery: Finely dice the celery for added crunch and freshness in every bite of your sandwich.
1/4 cup red onion: Dice finely to provide a subtle sweetness and a slight bite that complements the tuna.
1 teaspoon lemon juice: Freshly squeezed lemon juice brightens the flavor of the tuna filling, making it more vibrant.
1/4 teaspoon salt: Use this to taste; it helps enhance all other flavors in your sandwich.
1/4 teaspoon black pepper: Freshly ground black pepper adds warmth and depth to the overall taste.
8 slices whole grain bread: Choose your favorite type of bread; whole grain adds nutrition and heartiness to the sandwich.
4 leaves romaine lettuce: The lettuce acts as a barrier to keep the bread from getting soggy while adding crispness.
1 tomato sliced: Use ripe tomatoes for juiciness and sweetness that contrasts nicely with the savory tuna filling.
4 slices cheddar cheese: Cheese is optional but adds richness and flavor; choose sharp or mild based on preference.
The full ingredients list, including measurements, is provided in the recipe card directly below.
Let’s Make It Together
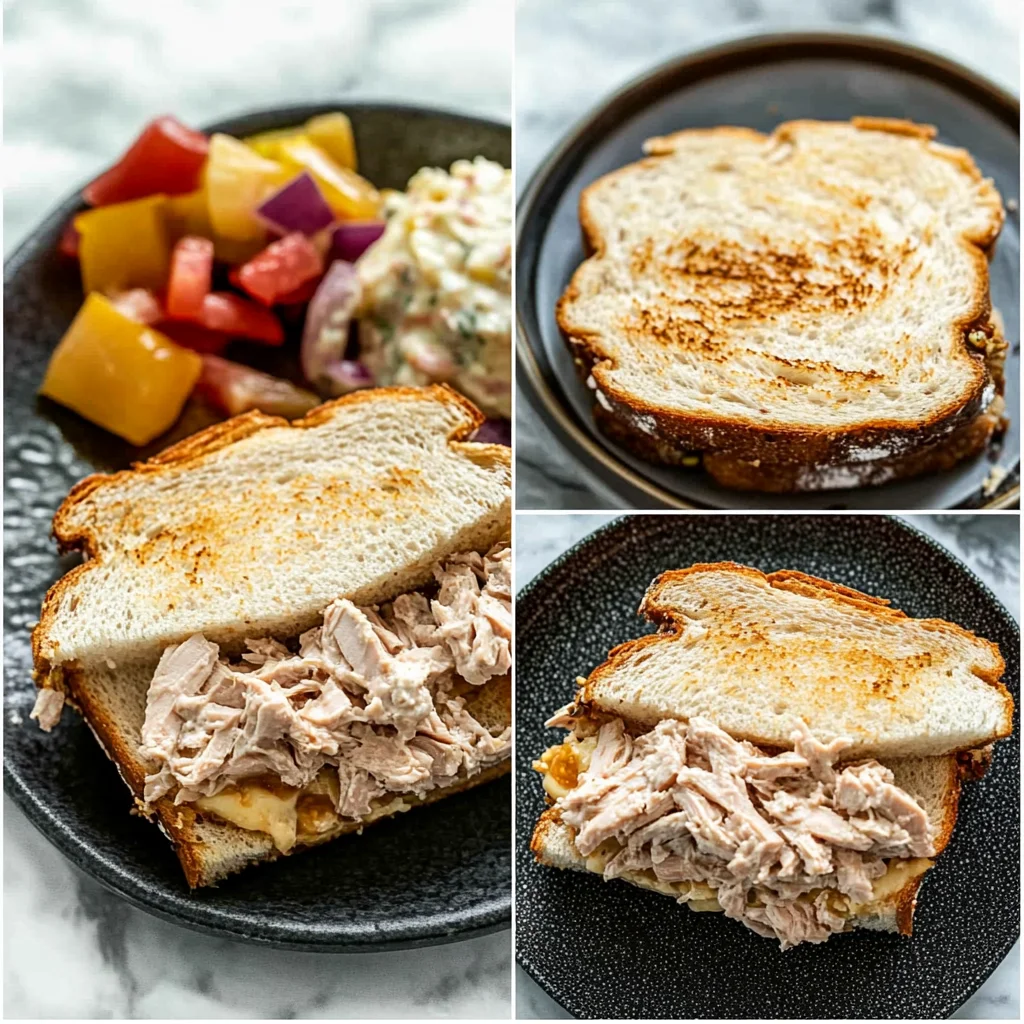
Step 1: Prepare the Tuna Filling:In a mixing bowl, combine 2 cans of drained tuna with 1/4 cup of mayonnaise, and if you’re feeling adventurous, add in 1 tablespoon of Dijon mustard for an extra flavor kick. The mixture should begin to take on a creamy texture. Next, fold in 1 stalk of finely diced celery and 1/4 cup of finely diced red onion. The fresh crunch from the celery and the sweet sharpness from the onion will elevate your filling significantly. Add 1 teaspoon of freshly squeezed lemon juice along with 1/4 teaspoon each of salt and black pepper. Use a fork to gently mix everything together until thoroughly combined; aim for that flaky consistency that lets you know it’s just right. This step should take about 3 minutes. Remember, you can always taste and adjust the seasoning to suit your palate!
Step 2: Prepare Your Bread and Lettuce:Grab your choice of whole grain bread—8 slices in total—and lay them out on a clean surface or plate. For freshness, wash and dry 4 leaves of romaine lettuce; they should feel crisp and refreshing to the touch. This lettuce layer is essential as it acts as a barrier to keep your bread from becoming soggy while adding delightful crunch.
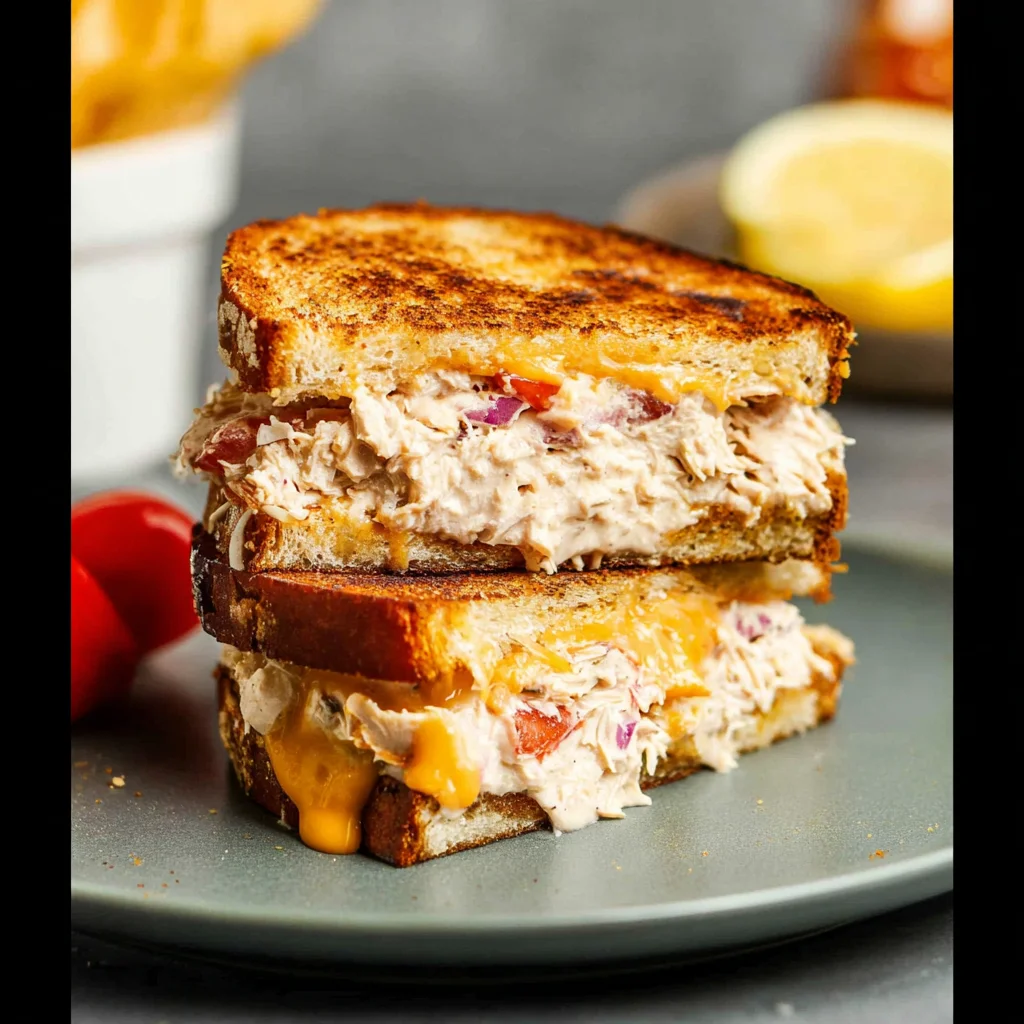
Step 3: Assemble the Sandwich:Take one slice of bread and layer a leaf of romaine lettuce on top. Spoon a generous amount of that delicious tuna filling onto the lettuce; you want it to look heaping but not spilling over! Then, add a slice of ripe tomato on top for a juicy contrast; its vibrant color will make your sandwich visually appealing too. If you’re including cheese, place a slice of cheddar on top of the tomato to add richness.
Step 4: Top It Off:Finish off your sandwich by placing another slice of bread on top. Press down gently to secure everything in place. As you do this, take a moment to appreciate the layers—how inviting they appear! Repeat this process for the remaining sandwiches.
Step 5: Cut and Serve:Using a sharp knife, cut each sandwich in half diagonally for easier handling—it also makes for a lovely presentation! Place them neatly on a plate, ready to be enjoyed at lunch or as an afternoon snack.
Now that your classic tuna sandwich is assembled, let’s explore some delightful serving suggestions that will complement this tasty creation!
You Must Know
- To elevate your tuna sandwich, consider letting the filling chill in the refrigerator for about 30 minutes before assembly.
- This allows the flavors to meld beautifully, enhancing every bite.
- When choosing bread for your tuna sandwich, opt for whole grain for added texture and nutrition.
- I’ve found that this choice complements the creamy filling perfectly while providing a satisfying crunch.
- Don’t skip the fresh lemon juice; it brightens up the tuna mixture and balances richness from the mayonnaise.
- A little acidity goes a long way in making the flavors pop!
Now that you have some expert tips, let’s dive into delicious variations of the classic tuna sandwich!
Add Your Touch
Feel free to customize your tuna sandwich by swapping out the whole grain bread for a crusty baguette or a gluten-free option. For a burst of flavor, consider adding diced pickles or capers to the tuna filling. You might also experiment with fresh herbs like dill or parsley for an aromatic twist. If you’re looking for extra crunch, thinly sliced bell peppers can be a delightful addition. Embrace your creativity and make this classic recipe uniquely yours! Now that you have the basics down, let’s explore some tips for perfecting your technique.
Storing & Serving
To maintain the freshness of your classic tuna sandwich, it’s best to consume it within 1-2 days when stored in an airtight container in the refrigerator. To prevent sogginess, keep the tuna filling separate from the bread until ready to serve. For optimal flavor, enjoy the sandwich cold and consider pairing it with a side of crisp vegetables or chips for a satisfying meal.
Now that we’ve covered storage and serving, let’s explore some delicious variations you can try!
Chef's Helpful Tips
- 1. To enhance the flavor of your tuna sandwich, consider letting the filling sit for about 10-15 minutes after mixing. This allows the ingredients to meld together, resulting in a more cohesive and flavorful spread.
- If you prefer a creamier texture in your filling, add a bit more mayonnaise than the suggested amount. Just remember to taste as you go to achieve your desired creaminess without overpowering the tuna’s natural flavor.
- For a crunchier bite, make sure to finely dice the celery and red onion; this ensures even distribution throughout the tuna mixture and prevents any large chunks from overwhelming each bite of your delicious tuna sandwich.
Now that you’ve mastered these helpful tips, let’s explore some creative variations on the classic tuna sandwich.
As I served the first tuna sandwich to my daughter, her eyes lit up with joy, reminding me how simple ingredients can create cherished moments around the dining table.
How to Know It’s Done Perfectly
To ensure your tuna sandwich is perfectly done, look for a vibrant filling that is creamy yet flaky, with the colors of celery and red onion peeking through. The bread should be fresh and slightly toasted, providing a satisfying crunch. Trust your taste buds—small variations in seasoning are perfectly acceptable! Now, let’s explore some serving suggestions to elevate your meal.
FAQ
What type of tuna is best for a classic tuna sandwich?
For a classic tuna sandwich, canned tuna in water is typically preferred due to its mild flavor and flaky texture, which mixes well with the other ingredients in the filling.
Can I customize the ingredients in my tuna sandwich?
Absolutely! While the recipe provides a delicious foundation, feel free to adjust the amounts of mayonnaise or add your favorite ingredients like chopped pickles or herbs for added flavor.
How can I make my tuna sandwich more nutritious?
To make your tuna sandwich more nutritious, consider adding extra vegetables such as sliced cucumbers or bell peppers, or using whole grain bread, which adds fiber and essential nutrients.
Is it safe to eat a tuna sandwich if it’s been left out?
It’s best to refrigerate your tuna sandwich if it’s not consumed within two hours after preparation to prevent any food safety issues. Always check for freshness before eating.
What can I serve with my tuna sandwich?
Tuna sandwiches pair wonderfully with fresh sides such as a crisp salad, vegetable sticks, or even a bowl of soup for a complete meal experience.
This comprehensive FAQ section should help answer some common questions about preparing and enjoying your tuna sandwich, enhancing your overall experience.
Classic Tuna Sandwich
Ingredients
Method
- In a mixing bowl, combine the drained tuna, mayonnaise, Dijon mustard (if using), diced celery, diced red onion, lemon juice, salt, and black pepper.
- Use a fork to mix everything together until well combined. The tuna should be flaky and the ingredients evenly distributed. Adjust seasoning to taste.
- Take one slice of bread and layer a leaf of romaine lettuce on top. This will help prevent the bread from getting soggy.
- Spoon a generous amount of the tuna filling onto the lettuce.
- Add a slice of tomato on top of the tuna filling. If using cheese, place a slice of cheddar on top of the tomato.
- Top with another slice of bread. Press down gently to secure the sandwich.
- Repeat the process for the remaining sandwiches.
- Cut each sandwich in half diagonally for easier eating and serve on a plate.